Tuesday 30 June 2020

How to write a envelope

How to address an envelopeHow to address an envelope


In the age of technology where people can send quick texts to their friends or easily FaceTime their family, it seems crazy that anyone would still need to know how to address a letter. Believe it or not, however, sometimes handwritten letters are the ideal mode of communication.
What's on the inside is up to you, but it's important to follow specific guidelines for the outside of the envelope to ensure your letter is sent to whomever it's intended for.

How to address an envelope

TODAY
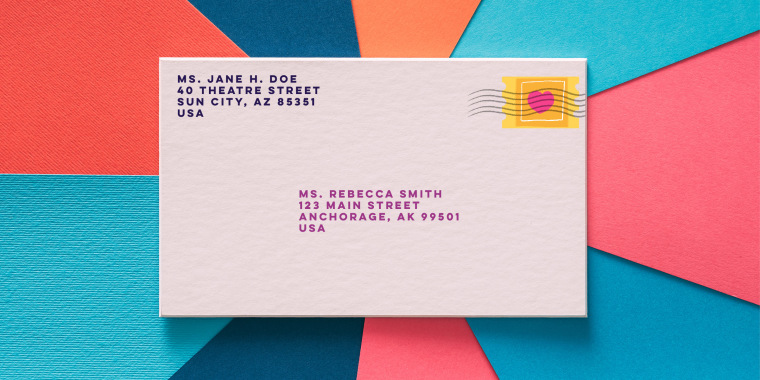
  1. Write the return address in the top left corner.
  2. Then, write the recipient's address slightly centered on the bottom half of the envelope.
  3. To finish, place the stamp in the top right corner.
There are two addresses that are typically seen on the envelope, but only one is technically required: the recipient's. The sender's address isn't necessary, but it is recommended. If there are any mistakes that prevent the delivery of the letter, the lack of a return address means the post office will be unable to send it back in order to fix any problems.

How to write the sender's (return) address

TODAY
  1. Start with your full name.
  2. Write your street address on the next line. If you need, it's okay to use two lines.
  3. Follow that line with the city, state and ZIP code of your address.

How to write the recipient's address

TODAY
  1. For informal letters, follow the same format as the sender's address.
  2. If sending a letter to someone at a specific business, the first line should be the company's name.
  3. In the next line, follow "ATTN:" or "c/o" with the individual's name. If the letter is not to someone at a specific business, the first line should simply be their name.
  4. The next lines two should be the street address, city, state and ZIP code.

How to format military addresses (APO, FPO, DPO)

TODAY
Even though they follow the same format as regular addresses, military addresses don't use the usual city and state names that many are used to.
  1. The city name will be either APO (Air/Army Post Office), FPO (Fleet Post Office) or DPO (Diplomatic Post Office).
  2. For the state, AA (Armed Forces America), AE (Armed Forces Europe) and AP (Armed Forces Pacific) are used, depending on the duty station.
  3. The ZIP code is the same, but sometimes the extra four number code is required for delivery.

How to write an international shipping address

TODAY
If sending a letter to an overseas address that isn't military, the address format typically stays the same — just with the addition of the country name as the last line.
Some countries place the ZIP code in front of the city and country but it varies from country to country, so just check to be sure.

How to find the "ZIP+4" code

If you're unsure of the extra four-number code, USPS has a ZIP code lookup tool on their website.
  1. Choose to look up the ZIP code by address and enter all the required information.
  2. Press "Find" and USPS will give you the ZIP+4 code.

How many stamps should you use

TODAY
Placing the stamp is easy, but knowing which stamps and how many to use is the hard part.
For a standard 1-ounce letter being shipped anywhere in America, Forever stamps are recommended because you'll always be able to use them regardless of future stamp price changes.
Every ounce over one costs 15 cents, so you'll have to use Additional Ounce stamps for every extra ounce. Two-ounce stamps are also an option.
If you're sending a postcard, don't cheat yourself with the Forever stamps. Postcards have their own stamps that are normally cheaper.
For international addresses, Global Forever stamps are used and just like the Forever stamps, you can use them whenever, regardless of price adjustments.
Irregular-shaped envelopes that may be used for square wedding invitations or graduation announcements require different stamps called non-machinable stamps. Because the square envelope can't fit the machine for automatic processing, the stamp costs a little extra to account for the non-machinable surcharge.
With the appropriate stamp, accurate addresses for both the sender and the recipient, and the right placement of all three on the envelope, your letter is ready to be sent!


from Fruitty Blog https://ift.tt/2AirfCd
via IFTTT

How to find volume of a cylinder

Volume of a Cylinder |Formula, Derivation, Surface Area and Examples


The volume of a cylinder is the density of the cylinder which signifies the amount of material it can carry or how much amount of any material can be immersed in it. It is given by the formula, πr2h, where r is the radius of the circular base and h is the height of the cylinder. The material could be a liquid quantity or any substance which can be filled in the cylinder uniformly. This has been explained in this article briefly along with solved examples for better understanding.  Apart from the volume of cylinder definition, its formula, derivation, the surface area is also discussed here.
Also read:

Definition

The cylinder is a three-dimensional shape having a circular base. A cylinder can be seen as a set of circular disks that are stacked on one another. Now, think of a scenario where we need to calculate the amount of sugar that can be accommodated in a cylindrical box. In other words, we mean to calculate the capacity or volume of this box. The capacity of a cylindrical box is basically equal to the volume of the cylinder involved. Thus, the volume of a three-dimensional shape is equal to the amount of space occupied by that shape.

Volume of a Cylinder Formula

As a cylinder can be seen as a collection of multiple congruent disks stacked one above the other. In order to calculate the space occupied by a cylinder, we calculate the space occupied by each disk and then add them up. Thus, the volume of the cylinder can be given by the product of the area of base and height.
Volume of a Cylinder
For any cylinder with base radius ‘r’, and height ‘h’, the volume will be base times the height.
Therefore, the cylinder’s volume of base radius ‘r’, and height ‘h’ = (area of base) × height of the cylinder
Since the  base is the circle, it can be written as
Volume =  πr× h
Therefore, the volume of a cylinder = πr2h cubic units.
84,821

Volume of Hollow Cylinder

In case of hollow cylinder, we measure two radius, one for inner circle and one for outer circle formed by the base of hollow cylinder. Suppose, r1 and r2 are the two radii of the given hollow cylinder with h as the height, then the volume of this cylinder can be written as;
  • V =  πh(r12 – r22)

Surface Area of Cylinder

The amount of square units required to cover the surface of the cylinder is the surface area of the cylinder. The formula for the surface area of the cylinder is equal to the total surface area of the bases of the cylinder and surface area of its sides.
  • A = 2πr2 + 2πrh

Volume of Cylinder in Litres

When we find the volume of the cylinder in cubic centimetres, we can convert the value in litres by knowing the below conversion, i.e.,
1 Litre = 1000 cubic cm or cm3
For example: If a cylindrical tube has a volume of 12 litres, then we can write the volume of the tube as 12 × 1000 cm3 = 12,000 cm3

Examples

Question 1: Calculate the volume of a given cylinder having height 20 cm and base radius of 14 cm. (Take pi = 22/7)
Solution:
Given:
Height  = 20 cm
radius = 14 cm
we know that;
Volume, V = πr2h  cubic units
V=(22/7) × 14  × 14  × 20
V= 12320 cm3
Therefore, the volume of a cylinder = 12320 cm3
Question 2: Calculate the radius of base of a cylindrical container of volume 440 cm3. Height of the cylindrical container is 35 cm. (Take pi = 22/7)
Solution:
Given:
Volume = 440 cm3
Height = 35 cm
We know from the formula of cylinder;
Volume, V = πr2h  cubic units
So, 440 = (22/7) × r2 × 35
r= (440 × 7)/(22 × 35 ) = 3080/770 = 4
Therefore, r = 2 cm
Therefore, the radius of a cylinder = 2 cm.


from Fruitty Blog https://ift.tt/38mvsBl
via IFTTT

How to fold pocket square

How To Fold A Pocket Square

How To Fold A Pocket Square 9 Different Ways

how to fold a pocket squareStep-by-step instructions for every pocket square fold you could ever want!
Note that most of these will work best with a pocket square that is, in fact, square.
Rectangular cloths can be made to work as well but will generally require folding from more than one edge rather than down the middle to make the cloth fit in the pocket.
Unless otherwise stated, a folded pocket square should always completely fill the width of the jacket pocket where it emerges.
You don't want the square looking like it's being swallowed up or spilling out over the edges into a messy bulge.
Are you wondering why you'd wear a pocket square? Check out this article on How to Start Wearing a Pocket Square.
Now let's get into it. Pick the fold you want to master and click:

#1. The Square Fold/Presidential Fold
#2. The One Point Fold
#3. The Two Point Fold
#4. The Three Point Fold
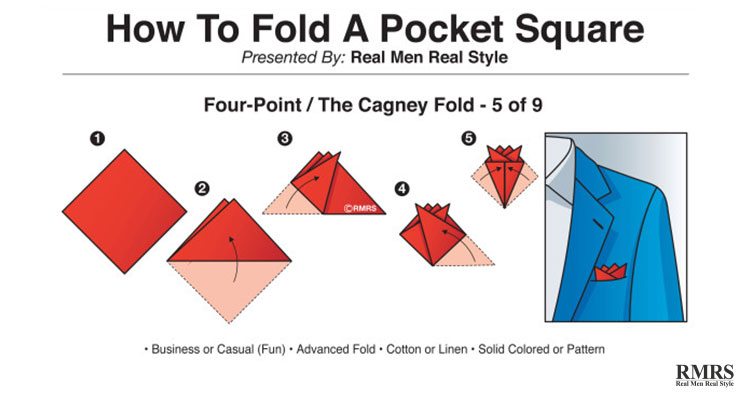
#5. The Four Point Fold/Cagney Fold
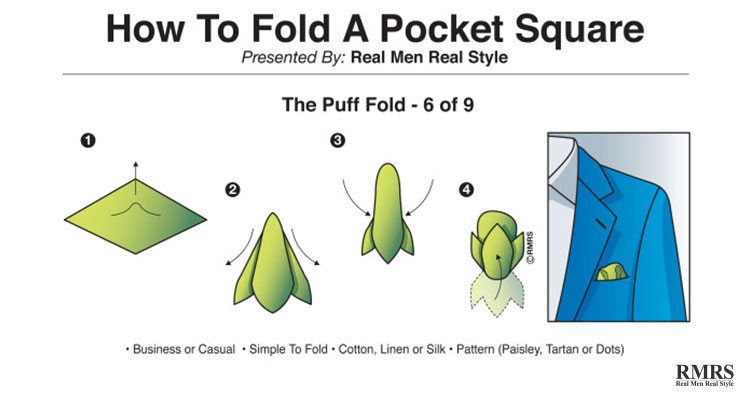
#6. The Puff Fold
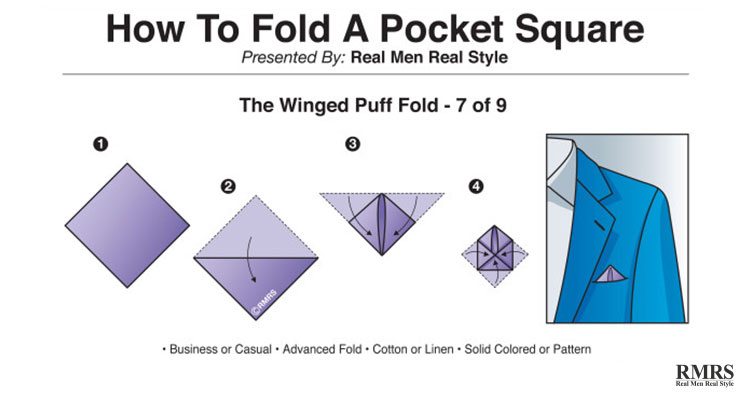
#7. The Winged Puff Fold
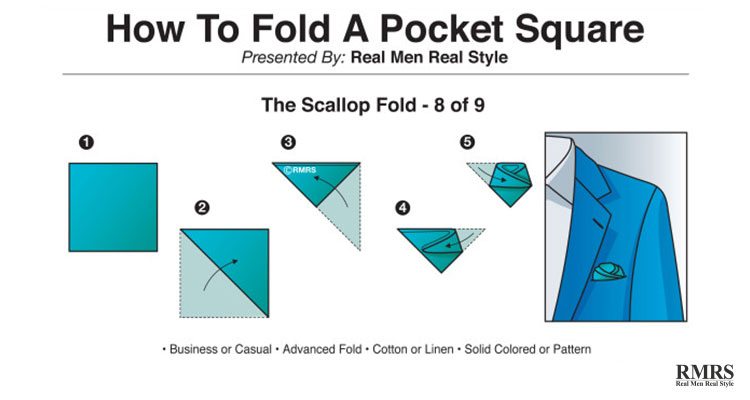
#8. The Scallop Fold
#9. The Dunaway Fold

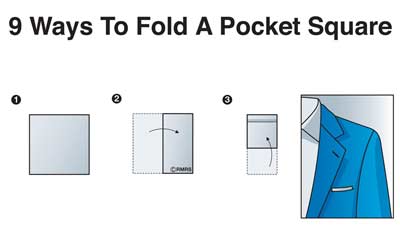
#1. The Square Fold | Presidential Pocket Square

how to fold a pocket square - presidential
  1. Begin with the pocket square fully unfolded and flat.
  2. Fold it to the width of your pocket. In most cases, a fold straight down the middle should do it.
  3. Fold it up from the bottom to form a finished rectangle the same width as your pocket, and about half an inch longer.
  4. Tuck the bottom fold of the pocket square into your pocket and snug it down to the base. Adjust as needed to create a single smooth strip of visible cloth running across the top of the pocket.
The square fold is the pocket square at its most basic: crisp, clean, and elegant. In its finished form, it appears as a single horizontal band of fabric parallel to the top of the breast pocket. Use this pocket square fold when you want maximum formality and understated elegance.

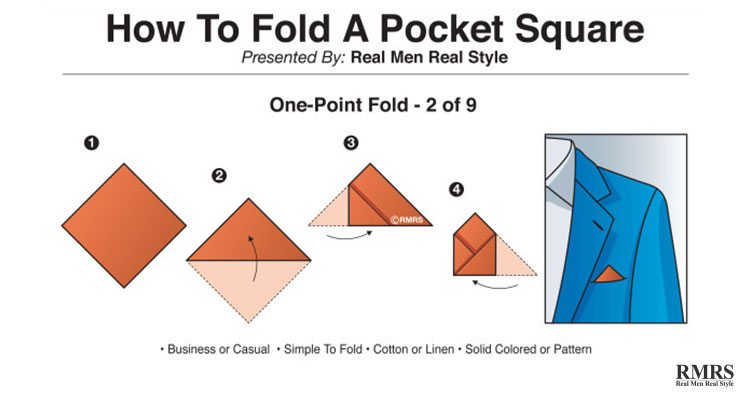
#2. One Point Fold Pocket Square

folding a pocket square - one-point
  1. Begin with the pocket square fully unfolded and flat.
  2. Fold it diagonally down the middle to make a triangle.
  3. At the base of the triangle, where the fold is, fold the doubled-over corner of the pocket square inward on one side.
  4. Fold the other corner. Make each fold the same size and the pocket square roughly the width of your pocket. The pocket square should look like an envelope: rectangular on three sides with a triangular point sticking up out of the top.
  5. Slide the bottom fold into your pocket and tuck it all the way down, hiding the rectangular edges. The only visible part of the pocket square should be the triangle pointing straight up.
The one-point pocket square fold is still simple enough to be business-appropriate, but relaxed enough to wear with a casual blazer too.

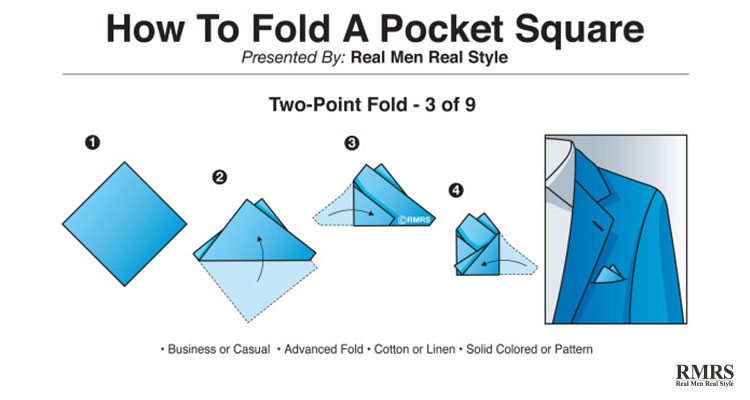
#3. The Two Point Fold

how to fold a handkerchief - two-point
  1. Begin with the pocket square fully unfolded and flat.
  2. Fold it diagonally. Angle the fold very slightly off-center, so that one corner lies just to the left of the other.
  3. At the base of the triangle, where the fold is, fold one of the doubled-over corners of the pocket square inward.
  4. Fold the other corner. Make each fold the same size and the pocket square roughly the width of your pocket.
  5. Tuck the flat bottom of the fold into your pocket and snug it all the way down until the vertical edges of the pocket square are completely hidden. The only thing visible should be the two slightly offset triangular points, spaced as close or wide as desired.
A dressy fold with a bit of flair, the two-point fold is popular among business professionals. It's easier than it looks — really just the basic one-point fold, slightly off-center.

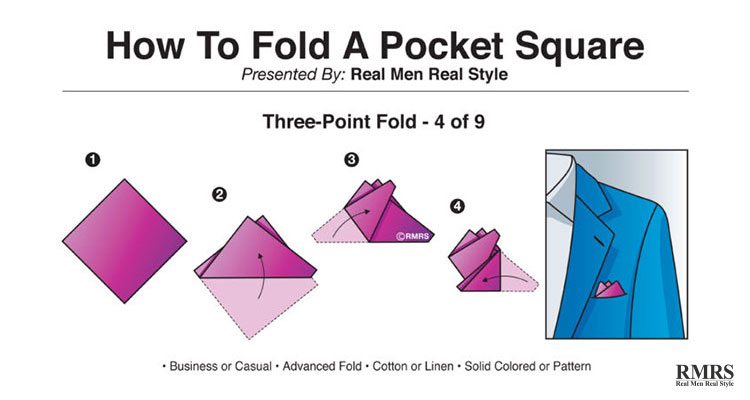
#4. The Three Point Fold

folding pocket squares - three-point

  1. Begin with the pocket square fully unfolded and flat.
  2. Fold it diagonally very slightly off-center, so that one corner lies just to the left of the other.
  3. Fold the bottom left corner of the pocket square diagonally up at an angle so you have three points side by side, as equally spaced and sized as possible.
  4. Fold the bottom right corner inward until the pocket square is roughly the width of your pocket.
  5. Tuck the bottom fold down into the pocket. Leave only the three points of the pocket square visible.
It can take a couple of tries to make more than one or two points of the pocket square line up neatly.
That makes the three-point pocket square fold a good one when you want to be a touch showy. It's still a business-appropriate fold, but make sure the pocket square is very neat and crisp.

#5. The Four Point Fold | The Cagney Fold

how to tie a pocket square - four-point

  1. Begin with the pocket square fully unfolded and flat.
  2. Fold the pocket square diagonally and very slightly off-center, so that one corner lies just to the left of the other.
  3. Fold the bottom left corner diagonally up across the fold, finishing with the point of the corner to the right of the top two corners.
  4. Fold the bottom right corner similarly to form a point to the left of the others. Adjust the pocket square to make all four points roughly the same size and equally spaced.
  5. If the folded pocket square is bigger than your pocket, fold the outside edges inward, tucking them below the four points.
  6. Tuck the long part of the pocket square into the pocket and snug it down until only the four tips are visible.
The four-point pocket square fold works best in a fabric that is both thin and stiff, like a starched linen.

#6. The Puff Fold

how to fold a hankie for a suit - puff

  1. Pinch the pocket square at the center and let the edges and corners hang down.
  2. Adjust the pocket square to hang evenly all around.
  3. Still pinching the center, tug gently on the dangling edges, pulling the square into a loose tube shape.
  4. Gently roll up from the bottom of the tube (or fold all the dangling edges back behind the tube) until the folded pocket square is short enough to tuck into your pocket.
  5. Tuck into your pocket until just the rounded top of the pocket square is visible.
Puff folds are supposed to have wrinkles and dimples. So long as the fold is staying in place and isn't badly creased or spilling over the edges of the pocket, it's fine.
Wear it when a certain insouciance is called for. It's not formal, but it is most certainly stylish. Winston Churchill was a puff fold man, especially in polka dots.

#7. The Winged Puff Fold

pocket handkerchief fold - winged puff

  1. Begin with the pocket square fully unfolded and flat.
  2. Fold the pocket square diagonally. Aim the point of the triangle down.
  3. Fold the corners from each end of the long side to the bottom point, making an equilateral diamond. Tug the top corner loose so the folded “wings” don't quite overlap.
  4. Fold the three corners that are not the winged top peak into the center of the pocket square.
  5. Tuck the squared-off sides of the finished fold into your pocket so only the peak is visible. Gently tease the two “wings” of the peak slightly apart. It's all right to let them take on a domed shape, like the puff fold.
This is the best fold for men who like a peaked fold, but have a soft, low-friction pocket square that won't hold a crisp crease. It's also quite compact, making it a good fold for undersized pocket squares.

8. The Scallop Fold

how do you fold a pocket square - scallop
Click the image above to see full size Infographic
  1. Begin with the pocket square fully unfolded and flat.
  2. Fold the pocket square diagonally down the middle.
  3. Fold the pocket square in half again.
  4. Lifting the pocket square, gently curl one of the doubled corners in and downward. Don't fold it or crease it — just bend it inward, at a bit of an angle.
  5. Repeat the process for the other corner of the pocket square. Curl it in and down, laying it atop the first corner you bent inward.
  6. Tuck the triangular point of the folded pocket square down into your pocket until only the tops of the curves are visible. They should lay neatly one atop the other, forming a rounded, scalloped shape with all points and straight edges hidden.
This pocket square fold is popular at weddings and other celebrations. It looks good with pocket squares in glossy, colorful fabrics, and is not a particularly formal fold.

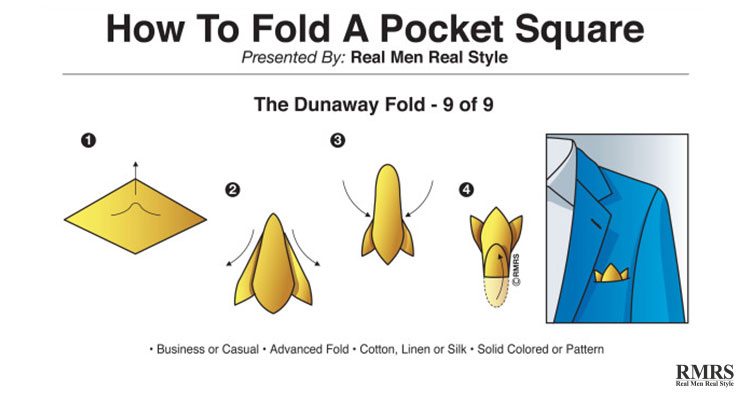
#9. The Dunaway Fold

how to fold a handkerchief for a suit - dunaway

  1. Pinch the pocket square at the center and let the edges and corners hang down.
  2. Adjust the pocket square so it hangs relatively evenly all around.
  3. Still pinching the center, tug gently on the dangling edges, pulling the pocket square into a loose tube shape.
  4. Invert the tube shape and spread the loose edges out with your fingertips so they look relatively symmetrical. Fold the center of the pocket square upward, stopping about halfway up the tube shape.
  5. Tuck into your pocket so that only the splayed edges of the pocket square are visible. Adjust the fold with your fingers as needed. Perfect symmetry is not needed.
This fold is the simplest way to make a slightly puffy, fringed shape with the edge of a pocket square. Depending on how stiff and how colorful your pocket square is, it tends to look something like a flower or a bursting firecracker.
Congratulations! You now know 9 ways to fold a pocket square. But do you know how to match pocket squares with different clothes?

REAL MEN REAL STYLE VIDEOS

×
You can find the steps outlined in this article in our infographic below. It features all 9 ways to fold a pocket square:
how to fold a pocket square
9 Ways To Fold A Pocket Square


from Fruitty Blog https://ift.tt/3dMKfX2
via IFTTT

how to cook brussel sprouts

Sautéed Brussels Sprouts {BEST EVER Recipe!}


I’ve been cheating. On Brussels sprouts. After more than a decade of cooking this stellar (if mis-maligned) vegetable in what I *thought* was the one and only way to make it taste delicious, I’ve become hooked on an entirely new (and faster) preparation method: Sautéed Brussels Sprouts.
A pan of sautéed brussels sprouts with balsamic
Charred and crispy on the outside, lightly caramelized and meaty on the inside, and ready to serve faster than you can say “hustle!” these sautéed Brussels sprouts have become my new go-to quick and easy side dish.
When cooked properly, Brussels sprouts taste fantastic, even addictive. While Brussels sprouts can be bitter raw, cooking them at a high temperature ensures they have a rich, caramelized flavor, and a tender, satisfying (but not mushy!) texture.
A well-cooked Brussels sprout will speedily displace whatever childhood trauma sad, mushy boiled Brussels sprouts inflicted upon you in the past.
Up until this point, classic Roasted Brussels Sprouts (and their elevated spinoff Roasted Brussels Sprouts with Garlic) have been the side dish stalwarts of our dinner routine. I mix up a pan and pop them into the oven several night a week.
Then, a few weeks ago when I’d planned to roast Brussels sprouts, I realized that due to poor planning, the oven was occupied with other endeavors. I’d have to find an alternative way to cook our Brussels sprouts. I turned to my trusty cast iron skillet and made sautéed Brussels sprouts on the stovetop instead.
DYAMITE!
The texture and flavor of these sautéed Brussels sprouts is outstanding. So outstanding in fact, they have (for the moment at least) replaced roasted Brussels sprouts as my preferred cooking method.
All you need to make sautéed Brussels sprouts is a heavy-bottomed pan, some olive oil, salt, and 10 minutes over medium-high heat.
I’m going to encourage you to add a splash of acid and maybe a handful of nuts or cheese if you feel so motivated, but if you like, you can just throw the halved Brussels sprouts in the pan and call it a day.
If you’ve been searching for a way to get more vegetables into your diet that a) doesn’t take too much work and b) you’ll actually enjoy eating, this easy sautéed Brussels sprouts recipe is the place to start.
Looking for even more ways to cook delicious, healthy Brussels sprouts (in addition to roasted and sautéed?) Try them shredded in this Shaved Brussels Sprouts SaladShaving the spouts thinly and topping them with plenty of lemony dressing also helps to remove their bitterness.
Crispy sautéed Brussels sprouts in a pan with balsamic, pine nuts, and fresh herbs

How to Make the Best Sautéed Brussels Sprouts

You’ll also see sautéed Brussels sprouts called pan fried Brussels sprouts, pan roasted Brussels sprouts, or pan sautéed Brussels sprouts. All of these terms refer to the same method of cooking the Brussels sprouts with oil in a large skillet over high heat. The ingredients are basic, the recipe prep is straightforward, and the results are exceptional.

The Ingredients

  • Brussels Sprouts. These delicious little green veggies are packed with Omega-3 fatty acids, fiber, and Vitamin C. Once sautéed, the sprouts will have a crisp, caramelized outside and tender but firm inside.
  • Olive Oil. Be generous to ensure the sprouts caramelize in the pan.
  • Kosher Salt. Kosher salt is critical to making your Brussels sprouts tasty. I always recommend kosher salt because it has a more pure, soft taste than table salt (which tastes metallic due to the treatment process that keeps the salt free-flowing). Season the sprouts as you go along, then at the very end to taste.
  • Black Pepper. As much or as little as you like.
  • Acid. Brussels sprouts crave acid; a splash will balance and perk up their flavor. In this recipe, I use balsamic vinegar, though you can also try lemon juice, pickled onions, or an entirely different vinegar.
No acid on hand? Just leave it out and vow to try Brussels sprouts with balsamic vinegar a different day. Your sautéed sprouts will still be tasty, I pinky promise.

The Directions

  1. Heat the oil in a large, heavy bottom skillet (a cast iron pan is a good choice), then add your Brussels sprouts. Cook undisturbed until caramelized.
  2. Add spices and stir. Continue to cook and stir until the Brussels sprouts are deep dark golden brown.
  3. Remove from the heat, and stir in the vinegar. Finish the sprouts off any way you like: a handful of Parmesan cheese, nuts, or herbs, or simply enjoy them just as the are. Serve hot and DIG IN! 

How to Trim Brussels Sprouts

  • Before trimming, I recommend washing your Brussels sprouts to remove any dirt.
  • To Trim: Use a knife to cut off the tough stem end of each Brussels sprout. Then, remove any yellow or damaged leaves, and cut each Brussels sprout in half lengthwise, from tip to trimmed end.

The Difference in Taste and Texture Between Sautéed Brussels Sprouts and Roasted Brussels Sprouts

While both oven roasted and pan sautéed Brussels sprouts have similar qualities—both taste addictively crispy and caramelized on the outside and distinctly savory—I have observed some differences between the two.
  • Oven roasted Brussels sprouts tend to be softer all the way through the interior.
  • Pan roasted Brussels sprouts stay firmer. They’re still delightful to eat, but they don’t totally melt in your mouth the way baked sprouts do.
  • So which is better? Honestly, I’m torn! I enjoy them both for different reasons and appreciate the variety. Try them both and see what you think.
Crispy sautéed Brussels sprouts in a pan with balsamic and pine nuts

Recipe Variations

  • Sautéed Brussels Sprouts with Bacon. Dice 4 slices of bacon, and cook them in your skillet. Once crispy, remove to a plate. Then, cook your sprouts in the bacon drippings. Top your finished sprouts with the crispy bacon pieces. YUM!
  • Sautéed Brussels Sprouts with Herbs. Add a tablespoon of fresh herbs to your sprouts at the end. I used parsley, but cilantro and mint would be delicious too.
  • Pan Fried Brussels Sprouts with Parmesan. Toss a handful of Parmesan over the sprouts at the end. Feta and goat cheese are other, super tasty options.
  • Sautéed Brussels Sprouts with Onions. Add 1/2 cup of thinly sliced onions to the pan with your Brussels sprouts. They’ll crisp and caramelize in a most excellent way.
  • Pan Sautéed Brussels Sprouts with Toasted Nuts. Stir a handful of chopped, raw nuts into the pan with the Brussels sprouts at the very end. Continue stirring, allowing the residual heat from the pan to toast the nuts. For today’s recipe, I used pine nuts. Walnuts and pecans are two of our other favorites.

What to Serve with Sautéed Brussels Sprouts

More Easy Vegetable Sides

How to Store, Reheat, and Freeze Sautéed Brussels Sprouts

  • To Store. Place cooked Brussels sprouts in an airtight storage container in the refrigerator for up to 4 days.
  • To Reheat. Gently rewarm leftovers in a large skillet on the stove over medium-low heat until warmed through, adding in a splash of balsamic vinegar to perk them back up. You can also microwave the Brussels sprouts on a microwave-safe plate until warm. Add fresh toppings as desired. My other favorite method is the oven: warm at 350 F until heated through (about 5 or so minutes).
  • To Freeze. Brussels sprouts can become soggy, so I don’t recommend freezing them. However, you certainly can freeze them if you don’t mind the less-than-optimal texture. Place cooked and cooled Brussels sprouts in an airtight freezer-safe container and store in the freezer for up to 2 months. Let thaw overnight in the refrigerator before reheating.

Recommended Tools to Make Sautéed Brussels Sprouts

Easy sautéed Brussels sprouts in a skillet with balsamic, Parsley, and pine nuts
We’ve been gobbling up this pan sautéed Brussels sprouts recipe. Pan frying is a fresh, healthy way to cook Brussels sprouts. Try it on a weeknight, and it’s an easy recipe for dinner parties too.
Do you cook Brussels sprouts at home? I’d love to hear from you in the comments section below!
A pan of sautéed brussels sprouts with balsamic

Sautéed Brussels Sprouts

Pan sautéed Brussels sprouts are a quick, easy way to make delicious Brussels sprouts you'll want to eat every night! Crispy, caramelized, and addictive!
Servings: 4 servings

Ingredients


  • 1 pound Brussels sprouts - trimmed and halved
  • 2 tablespoons extra virgin olive oil
  • ½ teaspoon kosher salt
  • ¼ teaspoon black pepper
  • 1 tablespoon balsamic vinegar or lemon juice
  • 1 to 2 tablespoons raw pine nuts - or chopped raw walnuts, almonds, or pecans (optional)
  • Chopped fresh herbs like parsley - cilantro or mint (optional)
  • A handful of Parmesan - feta, or goat cheese (optional)

Instructions


  • Heat a large cast iron or similar sturdy bottomed skillet over medium high for 4 minutes. Add the oil. As soon as the oil is hot and shining (but before it starts smoking), swirl to cost the pan, then add the halved Brussels sprouts. Shake the skillet a little and prod them so that as many as possible are cut-side down. Let sit completely undisturbed for 5 to 8 minutes, until they develop a dark, tasty, caramelized sear.
  • Add the salt and pepper. With a wooden spoon or spatula, stir the Brussels sprouts. Continue cooking, stirring every few minutes, until the Brussels sprouts are browned all over and just turning tender the inside, about 6 to 8 additional minutes.
  • Remove the pan from the heat. Stir in the vinegar, then the pine nuts or almonds. Let the residual heat of the skillet toast the nuts, stirring them very often so that they toast evenly on all sides and do not burn (if they aren’t toasting, return the skillet to low heat). As soon as the nuts are toasted, transfer the sprouts to a serving plate and sprinkle with fresh herbs. Enjoy hot.

Notes

  • TO STORE: Place cooked Brussels sprouts in an airtight storage container in the refrigerator for up to 4 days.
  • TO REHEAT: Gently rewarm leftovers in a large skillet over medium-low heat until warmed through. You can also microwave the Brussels sprouts on a microwave-safe plate until warm. Add fresh toppings as desired. 
  • TO FREEZE: Brussels sprouts can become soggy, so I don’t recommend freezing them. However, you certainly can freeze them. Place cooked and cooled Brussels sprouts in an airtight freezer-safe container and store in the freezer for up to 12 months. Let thaw overnight in the refrigerator before reheating.

from Fruitty Blog https://ift.tt/2NIcPyr
via IFTTT

How to break a fever

How to break a fever and help alleviate your symptoms5 Ways to Break Your Achiever Fever | Live Happy Magazine

A fever, which is generally considered a temperature above 100.4° F, is most commonly caused by infection, and is an effective response to fighting off viruses like the flu. It's often associated with symptoms like chills, muscle aches, and weakness. 
Most fevers will go away on their own in a few days and are not considered dangerous, but treating a fever with home remedies, and sometimes medication, can keep you more comfortable. Here's what you need to know. 

How to break a fever 

Fevers generally last between one and seven days, says Georgine Nanos, MD. "Most fevers, especially those caused by viruses, are usually self-limited, meaning they will resolve on their own," she says. 
Despite the fact that they're usually not dangerous, fevers can be uncomfortable, especially if they go above 101° F. Fevers that are especially high (above 104° F) or that are uncomfortable should be treated, says Joshua Mansour, MD. Here's how:
  • Drinking plenty of fluids. Fever can cause dehydration, so getting lots of fluids — particularly water — is important for both comfort and treatment. Some research has found that hot drinks provide more relief from symptoms like chills and runny nose than cold drinks. 
  • Cool the skin by using ice packs or a cool washcloth to the forehead or wrists. Avoid a cold bath, since that could cause you to shiver, which will raise your temperature more. These steps can improve comfort, although they won't address the root cause of the fever.
  • Rest. Staying in bed as much as possible, and sleeping whenever you're drowsy, allows your body to fight the underlying infection. Dress in light clothes and blankets, even if you're feeling chilled. 

When to take medication for a fever

Research is mixed about whether it is best to treat fevers or allow them to run their course. Fevers can be protective during an infection, though if there is discomfort, you can reduce symptoms with antipyretics — medications that suppress fever. 
The Mayo Clinic suggests treating babies between six months and two years old when their fever reaches 102° F (for babies under six months with a fever, call the doctor). Anyone older than two should use medication if their fever is higher than 102° F and they are experiencing discomfort. 
"If you're uncomfortable from the symptoms of a fever then it would be appropriate to take fever-reducing medications," Nanos says. "Reducing fever with medication also reduces associated symptoms of headache, chills, fatigue, muscle pains, and joint pains."
The most common medications for treating fever are:
  • Ibuprofen (Advil, Mortrin, and others): Ibuprofen can be used for most people older than six months of age, following dosing guidelines. If you have high blood pressure, heart disease, or kidney disease, ask your doctor before using ibuprofen. 
  • Acetaminophen (Tylenol and others): Acetaminophen can be used in infants and people of all ages, following the appropriate dosing guidelines. If you have liver disease, ask your doctor before using this medication. 
In addition, some studies have found that combined and alternating doses of ibuprofen and acetaminophen to be more effective at reducing fever in children. However, it's important not to give too much medication, so seeking medical advice from your provider is important before trying this. 
"The dosage of the medications differ between adults and children and is important to pay close attention," Mansour says. "It is important to avoid taking too much or for a very prolonged time."
Treating the underlying cause of the fever with medication is sometimes important. Bacterial infections might need to be treated with antibiotics. Some viral infections, including the flu, can be treated with antiviral medications like Tamiflu. 
"Treatment of the underlying cause will also reduce a fever, but this can take time," Mansour says. For more information about treating the underlying cause of a fever, read our article about the most common causes of a fever


from Fruitty Blog https://ift.tt/2BTB1Lz
via IFTTT

How to take screenshot on android

How to Take a Screenshot on a Galaxy S20 and Other Android Phones

How to take a screenshot on a Samsung Galaxy S20 and other Android phones 
Taking a snapshot of your Android phone’s screen is easy, and there are all sorts of situations where a screenshot could come in handy, whether you want to share your home screen with friends or obtain pictorial proof of your latest high score.

How to take a screenshot on any Android phone | Greenbot
This guide covers the latest Samsung Galaxy S20 and Note 10 Plus, though previous models will follow similar procedures. We’ve also included a guide to taking a screenshot on any other device using the most up-to-date Android 10 software, to the older Android 4.0 Ice Cream Sandwich.

How to take a screenshot on a Galaxy device by swiping the screen

Taking a screenshot on the Galaxy Note 10 Plus — or almost any other Galaxy phone — can be done with the swipe of a hand!
  1. Set your hand vertically on either side of the screen, and shape it like you are karate-chopping the phone.
  2. Horizontally swipe across the screen like your hand is a photo scanner.
  3. You should feel a vibration, see a screenshot animation brighten the screen, and receive a notification that a picture has been saved to the gallery.
  4. It may take a few tries, but practice makes perfect.
This technique works with Samsung phones that came out after 2013 including the Galaxy S4.

How to check if ‘Palm swipe to capture’ is enabled on your Galaxy

If you can’t get it to work, you may have to enable the swipe feature in Settings. The following is demoed on a device running Android 10, so older models may show slight variation.
  1. Open Settings > Advanced features > Motion and gestures.
  2. Tick the Palm swipe to capture box.
  3. Close the menu and find the screen you want to capture.
  4. Enjoy!

How to take a screenshot using a button shortcut

Not everyone is a fan of gesture controls. Thankfully, most Android phones offer a more tactile method for capturing a screenshot.
  1. Press the Power and Home buttons at the same time.
  2. Hold both buttons for a second, until you feel a vibration or see a visual indicating a picture has been taken.
  3. This can be awkward to get right. You need to hold the Power button slightly before pressing the Home button, then hold them both down.
This technique works with pretty much any Samsung phone that has a front Home button.
If you have a Galaxy S20, Galaxy S10, or Galaxy Note 10, which don’t have a physical Home button, then the key combination is a little different:
  1. Press and hold the Power and Volume down buttons at the same time.
  2. Hold both buttons for a second, until you hear a shutter sound or see a visual indicating a picture has been taken.
  3. You need to hold the Power button slightly before pressing the Volume down button, then hold them both down.

How to take a screenshot on a Note using the S Pen

This technique is available on the Galaxy Note 10 Plus and other Samsung devices with an S Pen. To take a screenshot this way, you have to open the Air Command menu, which you can do by pulling out the S Pen stylus, or by hovering the pen over the screen and clicking the button on it.
  1. Select Screen Write from the Air Command options to take a screenshot.
  2. You can then write notes on top of the image. There are options in the top toolbar to change your pen color and size if you want to get creative. You can also erase or undo strokes and there is a Crop option at the bottom.
  3. When you’re finished, tap Share or Save at the bottom.

How to take a screenshot on any other Android device

Taking a screenshot on any other Android phone or tablet — as in, one that is not a Samsung device — is also pretty easy. The method varies slightly from one model to the next, however, the following method should work on all non-Samsung Android phones running Android 4.0 Ice Cream Sandwich or later.
  1. Press the Power button and Volume down key at the same time.
  2. Hold them down until you hear an audible click or a screenshot sound. You should also see a small capture animation.
  3. You will get a notification that your screenshot was captured, and that you can share or delete it.
  4. By default, your screenshots are saved in your Photos or Gallery app in a separate Screenshots folder.
In Android 10, you can also press and hold the Power button to get a Screenshot option to pop up on screen. If you choose to edit the screenshot from the notification bar you’ll also find that you can mark it up, which is ideal if you want to highlight something specific.
For ancient Android phones, such as those running 2.3 Gingerbread, you need to head over to the Google Play Store, where there are several apps that will capture a screenshot on your behalf. Screenshot Easy is a popular choice but may require you to root your phone. You can also take a look at No Root Screenshot It if you don’t want to root your device.
We also have a dedicated guide on how to take a screenshot on a Google Pixel device.

Editors' Recommendations


from Fruitty Blog https://ift.tt/2BXBUCw
via IFTTT